# Custom fields
The module allows you to add custom fields to your products.
# Create a custom field
Add a new custom field by clicking on the Add a new field button and give it a name and a label (optional).
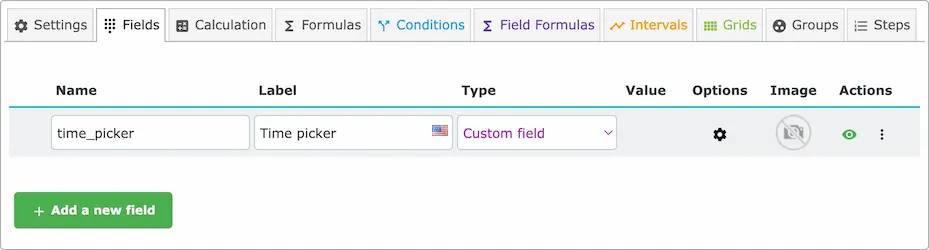
In this case, we created a custom field named time_picker, which will allow the customer to pick a time.
In the field settings, you can configure the script name and the JSON config. Both are optional.
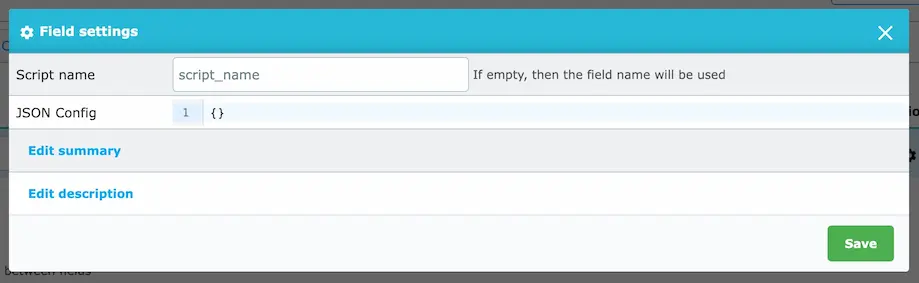
# Script name
The script name, if set, will tell the module to load the script dynamicproduct/scripts/[script name]/script.js.
Otherwise the field name will be used as the script name.
Using the script name is useful if you want to use the same script for multiple fields.
# JSON config
The JSON config is used to configure the field. It is a JSON object that may contain any properties that you want to use in your script. It's useful if you want to have a different behavior for each custom field.
Example:
{
  "minTime": "9:00am",
  "maxTime": "6:00pm",
  "startTime": "10:00",
}
This JSON config will be passed to the script as the config variable. In this case, the config will serve to configure
the time picker.
# Script
The script is a JavaScript file that will be loaded when the field is displayed.
Optionally, you can create a style.css file to add custom styles to the field.
Files:
/dynamicproduct/scripts/[script name]/script.js
/dynamicproduct/scripts/[script name]/style.css (Optional)

In this example, the script name is `time_picker` so the files will be:
/dynamicproduct/scripts/time_picker/script.js
/dynamicproduct/scripts/time_picker/style.css
# Gettings started
After creating the files, add the init function to the script.js file:
function dpInitScriptName(field_name, config) {
  // Your code here
}
Replace ScriptName in the function name with the script name that you used in the field settings. It should be in
PascalCase.
TIP
You can open the console to see the function name that you should add to the script.
Here's an example of the error message that you will see if you don't add the function:
dynamic_product[time_picker]: function window.dpInitTimePicker not found
In our example, the function name will be dpInitTimePicker.
function dpInitTimePicker(field_name, config) {
  // Your code here
}
Actual script:
function dpInitTimePicker(field_name, config) {
  // the target div is the field div with id="dp_[field_name]"
  const target = document.querySelector(`#dp_${field_name}`)

  // create an <input/> element and append it to the target div
  const input = $(`<input type="text" class="form-control" id="dp_time_${field_name}"/>`).appendTo(target)

  $("head").append(`<link rel="stylesheet" href="//cdnjs.cloudflare.com/ajax/libs/timepicker/1.3.5/jquery.timepicker.min.css">`)

  $.getScript("//cdnjs.cloudflare.com/ajax/libs/timepicker/1.3.5/jquery.timepicker.min.js", function () {
    // init the timepicker on the input and pass the config directly
    input
      .timepicker(config)
      .on("time-change", function () {
        // when the timepicker value changes, update the field value
        window.updateField(field_name, {
          value: input.val()
        })
      })
  })
}
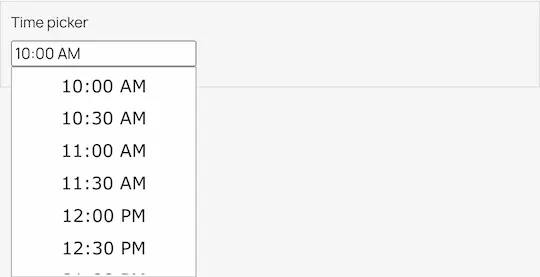
The field will be displayed like this
TIP
The recommended way to write the custom script is to use Svelte (opens new window) as it allows you to write your custom field in a declarative and simple way.
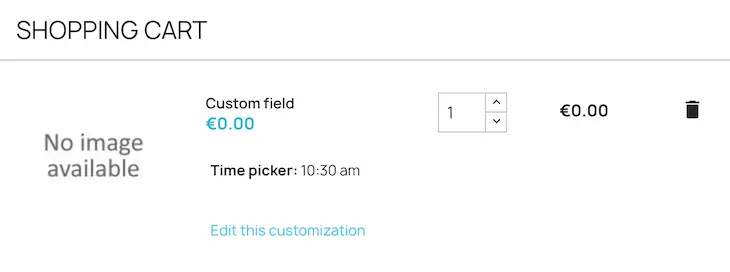
The field will be displayed like this in cart:

# Customizing the field display in cart
If you'd like to customize the field display in cart, you can add an InputField.php file to the script folder.
Path: /dynamicproduct/scripts/[script name]/InputField.php
Sample content:
<?php

namespace DynamicProductData\scripts\[script name];

use DynamicProduct\classes\models\DynamicInputField;

class InputField extends DynamicInputField
{
    // Open the DynamicInputField class to see all the available methods
    // Path: /modules/tunisoft/apps/dynamicproduct/classes/models/DynamicInputField.php
}
Replace the [script name] with the script name that you used in the field settings.
Examples:
Skip the field in cart:
<?php

namespace DynamicProductData\scripts\time_picker;

use DynamicProduct\classes\models\DynamicInputField;

class InputField extends DynamicInputField
{
    public function isSkipped()
    {
        // Don't display the field in cart
        return true;
    }
}
Display the field value in lowercase:
<?php

namespace DynamicProductData\scripts\time_picker;

use DynamicProduct\classes\models\DynamicInputField;

class InputField extends DynamicInputField
{
    public function displayValue()
    {
        // Display the field value in lowercase
        return strtolower($this->value);
    }
}
Display a custom value:
<?php

namespace DynamicProductData\scripts\time_picker;

use DynamicProduct\classes\models\DynamicInputField;

class InputField extends DynamicInputField
{
    public function getTemplatePath()
    {
        return dirname(__FILE__) . '/template.tpl';
    }
}
{* Path: /dynamicproduct/scripts/time_picker/template.tpl *}
<i class="material-icons">schedule</i> {$input_field->value}